DIY recumbent / vélo couché
This is a project I started and stopped many times. I changed materials, designs, looked for easy ways to do things without much tools.
1 First try
The first attempt was based on the Ez Clone recumbent. It was fun to build, I learnt about brazing. But it was not really rideable, nothing was aligned, and it requires the gear to braze which is not the best/easiest thing to do in an appartment.
Here is what it looked like:

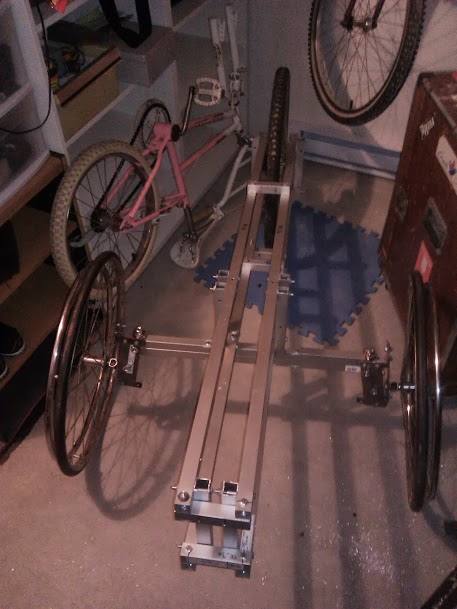
2 Second attempt
Then I figured out, wouldn't that be really cool to be able to use the bike even in winter without feeling I risk my life sliding in slush and slip under cars?
So I decided to get on a Trike.
There are a few projects out there for trike recumbents, most are using soldering/brazing. Not having the gear or the space for that I opted for nuts and bolts.
I started with the N55 spaceframe trike. Its nice because they give the plans (with a few mistakes but that is really nothing1) and they use plain easy to find material:
- drill
- nuts and bolts found in hardware stores
- aluminum tubes found in hardware stores
Built the frame pretty easily, without a drill press the holes are hard to get straight, but once its tightened, they kind of align pretty well. I also changed the direction design based on Tribolttrike. Basically, it uses rod-end bearings (here they can be known as 'heim joint', embouts à roulements or embouts à rotule) to have create a centerpoint steering.
Here is a few expressions I learnt so far:
- centerpoint steering: the axle of the steering should be aligned with the contact point between the wheel and the floor.
from http://poisson.me.dal.ca/~dp_03_4/steering.html here is the interest of such a steering
This inclination is used to minimize bump and brake steer by allowing the forces from the impact to be in line with the turning axis.
- trail or caster: see Wikipedia, basically the same idea as centerpoint steering but with the angle of the fork. That plays on stability and control (I have read somewhere that to see why it is needed to look at shopping carts wheels, and see how they move from side to side all the time, I guess we don't want our bikes wheels to be that wobbly)
That's what it looked like
3 More details to come soon
Footnotes:
After talking with someone from the N55 project, here is what got out:
In the pdf, I think dimensions on fr_1a should be 585.00 and 635.00 instead of 58.50 and 63.50, and fr_1b is missing 2 holes on the side. Holes in the side should be 2.5cm in each direction from the measurement at the top. There is also another mistake at FR_4c: you need two of the small square plates, but the hole in the middle has to be a lot smaller (only for the axle of the crankbox), something like: 20mm